Thursday, October 8, 2009

Custom Make Your Own Puzzles

As a room Mom for the 5th grade, I was assigned the task of planning for Halloween. The teachers at my kid's school had asked for something different. Their thought is that the kids get way too much candy and treats anyway, so let's NOT stuff their treat bags with sugar. They also wanted some activities. We came up with a "Brain Bag". These bags will contain things like pencils, a coupon for a book at the book fair, erasers, and the like. I made this custom search-a-word puzzle for the kids. Did you know that you can make all sorts of puzzles for FREE? Try this site. It's so fun for the kids to find their own name in a puzzle, or the name of their teacher.

I printed the puzzle, then stamped it with a pumpkin to add some color. I then rolled the sheets and secured it with a sparkly sticker. How's that for a Treat?

Monday, October 5, 2009

Returning The Gate: This Weekend's Project

I grew up on a farm that has been in my family for generations. Over 170 years. In that amount of time, and acres to work with, a lot of "stuff" can be accumulated. Take into account that these people often didn't have a lot to work with, they were isolated, and not wealthy. Add to that: they made it through the Great Depression, and that's why EVERYTHING is saved.


This gate has been in the barn since I can remember. Isn't it beautiful? The newels are in the picture above. My Dad told me that this gate and fencing was originally erected around a family cemetery plot. His Mother's family buried 5 children in one year because of diphtheria. His Mother, and 4 other siblings, survived.
The fence was removed in the 1940's to make it easier to mow the cemetery. My Dad used the fence for pigs (He was young, and stupid, and didn't see the value in an old fence...His words, not mine). So, much of the original fencing has been destroyed, but he still has about 12' and the gate.
When I said I'd ask if the cemetery would want it back, he acted as if a weight had been lifted.
I think he has felt badly, all of these years, and would be happy to have it returned to the original cemetery plot, or at least to have offered it back to them. So that's how I came to spend the weekend trying to return a cemetery gate.

Friday, October 2, 2009

Chair Sleeve Tutorial

I was approached by our Kindergarten teacher and she asked me to make a chair sleeve for the "Star of the Week". Each child in class gets a chance to be in the limelight and tell about themselves for a week during the school year. It's a much anticipated week when you are 5. Last year, they decorated the back of the special person's chair with some bows that became very tired looking by the end of the year. Looked less special, and more like old wrappings pulled out of the trash.

I gathered my supplies: Red polar fleece, a denim fabric with glittery stars, white and blue felt, various colored threads and some buttons.

I measured the back of the chair, and cut 2 pieces of my polar fleece only slightly larger. I used polar fleece for 4 reasons: 1.) it's stretchy, 2.) it doesn't fray, and a raw edge is fine, 3.) it's soft and 4.) it wears well.

I cut out the words "I am a Star" directly from the white felt. I printed my own star pattern off of the computer and pinned that to a piece of blue felt. I used felt (again) because it doesn't fray and a raw edge is fine.


Then, I began stitching the words directly on to the blue felt with colorful thick thread. I also sewed a few red star buttons along the word 'star'.


After a few layers of felt, denim and polar fleece, here are the results. Notice how I used pinking shears on both the polar fleece and the denim. This adds yet another layer of interest, and prevents the denim from fraying. I handstitched the letters and the star to the layers of denim and polar fleece. Then I machine sewed the two layers of the polar fleece sleeve together on 3 sides. I made sure to heavily stitch the bottom corners, near the opening, as these will be the seams that get the most stress. The teacher was thrilled.
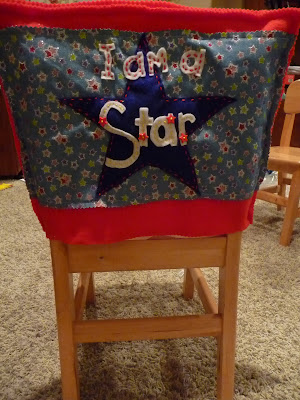

The sleeve easily slides over the top of a kindergarten sized chair, and can be moved from week to week. I really like how all of the layers, different fabrics and buttons add texture and dimension. The bright colors make it cheerful and eye-catching.

I was thinking these would be a great addition to a holiday table. Felt pumpkins with a few sequins, or Christmas trees with button ornaments would be beautiful. You could also make them for your everyday kitchen table. Maybe put the kid's names at their chairs. How about a special "It's My Birthday" sleeve that makes the rounds for each member of a family? If you make one, be sure to link back, I'd love to see what you've come up with!

Wednesday, September 30, 2009

Do Yourself a Favor: Add This To Your Contacts

I hate paying for directory assistance. But, as we are all living "on the go", it's hard to have every phone number handy. It's also convenient to make appointments and make a few short calls as you are waiting for the kids at dance class/soccer/swim/hockey etc.

I had been using 1-800-FREE411. This service is toll free, but has become so cumbersome with ads, that I really dislike using it.

A friend told me about something new, and I just have to share here: Google has introduced a free voice activated directory assistance. It's well worth the addition to your contact list.
1-800-GOOG411. The voice recognition is great, so you don't get Bonnie's Bar when you wanted Johnny's Car.

Check out the How To Video Here: http://www.google.com/goog411

Sunday, September 27, 2009

Oh, Yes, A Sweet House, Indeed

We were able to schedule in a Sweet get together with the "Sisters" last week. We met at The Sweet House Bakery. As you enter, to the right, is the bakery. The counters just ooze with deliciousness. Cupcakes, cookies, cinnamon buns, goodness in all things baked. They have recently won the Best Bakery award from Pittsburgh Magazine!

Ah, but to the left, is this incredibly inviting living room. Leather couches and a high meeting table. A perfect place to share stories, laugh, and catch up. Check out this little guy making himself at home while we sneak in a little "Mom Time". And. Yes, those are cakes on the wall.

I loved this side table. When I took a second look, I realized that the legs are full of sprinkles and jimmies and all things fun.


And here's a self portrait in front of the hearth. Do you see how we are all revived and energized after a fun morning full of laughs and stories?


Wednesday, September 23, 2009

Psst...Check Out My Guest Post

Beckie over at Infarrantly Creative asked me to do a Guest Post. Check it out HERE.
Some Gold Leafed Pears would be just the thing to add some shimmer to your fall table.

I Found A Treasure Trove

Doesn't this just pull you in. I know what you are thinking: What IS all of that? It's dressers, and tables, and a very scary old clown (?).


I have been driving by this Barn Full of Treasure for years. Something about the furniture out front and the half off sign got me to stop this time. Let me just say, I had no idea. Just look at all of this beautiful stuff!


I have been keeping a close eye on all of you out there that can find a dirty old chair and reform it into an amazing centerpiece for a room. I kept thinking of all of you as I roamed the tiny stacked paths that wind through this place.


I came across this crib with a beam of sunlight coming through the window. It stopped me dead in my tracks. The crib's mattress is hand sewed out of flour sacks. So sweet.


And, just look at these baskets that I found in the basement. They were all alike, and had a hinged lid and a rubber strap. They must be picking baskets of some sort.
There was literally too much to take in all at once. I saw so much potential in so many things, I was overwhelmed. If you need something special, like a chair, or a dining set, or a dresser, or a table, AND, you live near or are travelling to South Western Pennsylvania, email me, and I'll give you the exact location. The possibilities are endless at this place.

Friday, September 18, 2009

This Ring Rocks...Literally.

I don't often get "stories" about my customers. But, I got this one recently, and I thought I'd share.
I sell my items at a local shop that specializes in handmade goods. The shop has quite a loyal following, and gets many special requests. There was a lady who had requested the above ring in a size 10. Well, I don't usually do a 10. (Whole sizes, 6-9 is what I carry). I had to decline.

Then I got a call from the shop saying that the lady was begging. This woman has a form of arthritis that has caused her knuckles to become larger, hence the need for a larger size. This woman also is the lead singer for a local band. The band is pretty big locally, and opens for some big bands that tour nationally. She wants to wear my ring onstage! She just thought it would be the perfect compliment wrapped around the microphone.

I told my hubby about the request, and he made it happen. The ring is now a perfect size 10, and is ready to rock!

Wednesday, September 16, 2009

Terrarium Tutorial

I was inspired by the great glass jar that I found at a yard sale for $1. Last year at about this time, some friends and I collected ferns and moss from the local woods, and made terrariums.

Another friend has always admired mine, and it's still going strong over a year later.

Here's what you'll need: A glass jar with a glass lid. Taller is better than wider.
Some small gravel.
Some Potting soil.
Small ferns and moss and any other kind of petite forest find.


Look at this cute little rock I found with the little bits of moss growing on it!

So, here's what you do: Put some gravel in the bottom of the glass jar. Then, layer potting soil (a cup or two is all you need). You can just use regular forest dirt, but you take the risk of watching worms and other bugs toil away in there until they are no longer part of this world.

Then, begin your planting. Remember, you need small plants so that the terrarium is in proportion.

Tuck the moss in at the base of the fern, then any other forest goodies that you may have found.

Spray liberally with water. This serves two purposes: 1.) to water the plants, and 2.)to wash the dirt from the plants and the sides of the container.

Take a dry paper towel and wipe the inside of the container just to make sure it is sparkly clean.

And, this little bit of forest floor will be just what you need come January. If you keep this little ecosystem on your kitchen table, like I do, then you can be constantly reminded of the lush, green summer. And, be sure to take the lid off occasionally...it smells just like the woods too.

Here are the Care and Keeping Instructions:

Place your terrarium in indirect light; direct light will cause too much heat to build up.
-Most terrariums won't need watering for 4-6 months. You'll know it's time when the plants look wilted, or the water stops condensing on the sides of the container.
-When you are ready to water, mist the sides of the terrarium, with water, rather than the leaves.

-If the sides of the terrarium are always fogged, or large droplets of water form on the top, there is too much moisture trapped inside. Remove the lid for a day or two to dehumidify.
I made a few of these as Christmas Gifts last year, and they were a favorite. You may want to get some started right now for a few special people on your list!

Sunday, September 13, 2009

I'm Thinking About Keeping Bees

I've been reading this book by Sue Hubbell, and I'm feeling so inspired. Sue describes being a beekeeper in such a romantic, yet rural way, that you really can't help thinking about it yourself.

Bees have been a source of fascination for thousands of years. In every culture, they have been viewed with respect and honor. And, even though bees have been studied for so many years, there are still so many questions yet to be answered.

Sue describes how a bee sees flowers. For example, nearly all early spring flowers are white. To a bee's eye, white glows an iridescent blue. She also explains that bees never pollinate red flowers, they are always pollinated by hummingbirds, or butterflies of something else.
The pollination work of Bees is often undervalued. Lest we forget that nearly every fruit and vegetable that we eat was once pollinated by a bee in order to grow.
Sue describes how to join two hives. I think the method that she uses is a model for joining rival groups of all kinds: First, the beekeeper disposes the queen of the weaker group (I'm not sure this the part I'd like to emphasise in my metaphor.) Then, the beekeeper places the weaker hive on top of the strong hive with a sheet of newspaper in between the boxes in which they live. All bees HATE any kind of foreign matter/dirt in their hives. So, both hives will work at removing the newspaper, the weak group will work from the top, the strong group will work from the bottom. By the time the groups meet, they have become united through their work towards a common goal. Isn't this a beautiful metaphor for how many different groups could set aside hate and become partners?

Wednesday, September 9, 2009

Fabulous Flower Belt Tutorial

I made some flowers out of boiled wool, a bit of thread and some buttons. See my post yesterday for the tutorial. These flowers are sweet on their own, but something struck me, and I just had to give in.

I found this nice thick brown leather belt in my closet. Pretty plain and utilitarian.


Then, I sewed one of my boiled wool flowers to the buckle.

Take a look at this belt!

I love a side-slung belt, and this little flower at the hip was just the thing to make this belt something special. I absolutely adore it!

Boiled Wool Flowers Tutorial


So, If you all boiled a wool sweater yesterday, then you are ready for today. Here are the things that you'll need: A nice pair of scissors, pinking shears if you have them, some pins, paper, various buttons, and colored threads.

My sweater shrunk up very nicely. I drew several flower shapes onto paper. Then, I pinned the paper to the wool, and cut them out. Sometimes I just eyeballed a circle and cut a few of various sizes. Sometimes I used the pinking scissors, sometimes not. I was working with a friend who had some great ideas, and a great eye for color. So, we came up with some pretty sweet flowers:


I liked the layered look and the monotone wool. The added color of the thread and the buttons was just what this little adornment needed. If you cut 3 shapes and sew a button to the center, be sure to pull your thread tightly so that pedals will flare a little, and the center will be indented slightly.

On some, we sewed a pin to the back, so that they could be easily attached to a hat, or a sweater.

Stop back tomorrow to see what I did with mine! It's fabulous!